The Double Vision Technique is such a cool easy way to create a wow on your projects. This technique is great for designer papers that look like scenery or depict scenes. My Stamp Club did this card in May for the monthly technique. So, I also have a video for ...
For my April clubs, I taught the Metallic Mosaics Technique featuring the Joyful Squares Bundle. This is a technique I saw another demonstrator do except with odd shaped pieces. I tried it out and didn't like how long it took to place all the odd shapes together ...
My March technique was Brayered Embossing Folders. I'll post the video below too. The Stone & Vine 3D embossing folder uses Gray Granite on Gray Granite for the regular card. Then, I used the Lazy Daisy 3D embossing folder for the mini sample for our ...
My January clubs learned the Double Collar Fold Technique. At least, that's what I'm calling it. Stampin' Up! showed us this technique as part of a demo video for ideas with our December Product of the Month. I love how easy this technique is. Here's several ...
Embossing with dies is an easy technique using any dies. Just change your "sandwich" on your Stampin' Cut & Emboss Machine. Watch my video below for all the details. I used the Snowflake Kisses dies for this card front embossed background. My stamp clubs ...
This Christmas card I designed in October uses the mosaic tile technique. Simply cut up your design after stamping in even squares or rectangles and mat onto card stock with "grout" spaces between the blocks. Since this was my monthly technique for my clubs, I ...
My technique journal was full as of a couple months ago. So, I desperately needed to decorate and start a new journal. I keep all my old journals of course. Before I show you my new one, here's photos of my 4 older, full journals. Plus, I did a video of ...
My “12 Weeks of Christmas” 2025 FREE tutorials start today! Everyone on my mailing list will receive a free tutorial every week. If you haven’t joined my list, now is the time. Not only will you receive a link to the 12 Christmas tutorials in your weekly email, ...
This month I did the fault line technique featuring the Elegant Pine Snowflakes Suite Collection. I love this suite with all the greens and blue-greens included. It has Garden Green, Old Olive, Pretty Peacock, Secret Sea, & Shaded Spruce plus a little Cherry ...
I love this carved wood technique and thought it would be great with the Jolly Holly bundle. So, I designed this card for my August Stamp Clubs to learn this technique. Of course, I also designed a technique journal sample and produced a video. Here's the card ...
For July, I taught the Double Embossing Technique featuring the Sunflower 3D embossing folder. As soon as I saw this folder, I decided Early Espresso would be involved somehow. I played with some other techniques and decided on double embossing with copper ...
I got a request to do a Pop Out Swing card for my June technique. Since there are more surfaces to add designer paper, I decided to showcase the Kintsugi Inspirations Suite Collection paper. Plus, I hadn't played with this suite yet, so here's what I came up ...
Get a free Technique Tutorial today plus weekly information about promotions, contests, tips, favorite projects, classes, events, new products & announcements.
Download your free tutorial
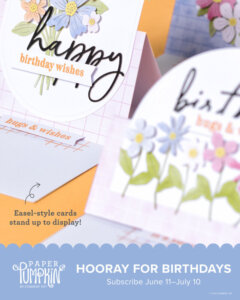
Paper Pumpkin Monthly Kit
Shop Online
Find it here:
Archives
Categories
Achievements
Disclaimer
The content in this blog is the sole responsibility of Barbara Greenlee as an Independent Stampin’ Up! Demonstrator. The use of and content of classes, services or products offered is not endorsed by Stampin’ Up!
Get a FREE Technique Tutorial today and weekly information about promotions, contests, tips, favorite projects, classes & events, and new products & announcements.